How to Wire an Outlet With 4 Wires
I am currently a licensed contractor performing remodeling services for residential and commercial customers in Wisconsin.
Learn what to do in case your outlet stops working due to a stranded wire
What to Do In Case of a Stranded Wire
Electrical wiring needs to be performed with care. Most of the standard outlets and light switches present in homes are 110 to 120 volts, making shocks uncomfortable, but not deadly. Still, there is specific knowledge needed to wire outlets and switches, especially when the wire is not standard solid wire, but stranded wire. Solid wire refers to standard household electrical wire where the copper or aluminum wire is one solid piece throughout. Stranded wire is copper or aluminum wire that has many strands twisted together to form one wire.
- Voltage meter
- Flathead screwdriver
- Electrical strippers
- Fork connectors
- Electrical crimpers
Step-By-Step Instructions
Step 1
Make sure that the power is off to the stranded wires you are working with by testing the wires with a voltage meter. Turn the meter to "V" for Volts or "A" for Amps (on some meters, it will have Ohm and Hz ratings. For this application, use the volts or amps readings only. If the meter has a reading other than 0, you will need to switch the breaker that allows power to circulate to that outlet to off. Typical readings for outlets ranges from 15 to 20 Amps or 110 to 120 volts.
Step 2
Take the stranded black and white wires and strip the ends about 1/2 inch back from the end with the electrical strippers. Use the correct wire gauge indicator on your wire strippers to strip the coating off the wire, making sure not to nick any of the strands.
Step 3
Twist the end of one of the wires so it forms a solid piece. Repeat for the other wires. This will keep the wire as a solid piece to install in a fork connector.
Read More From Dengarden
Step 4
Take a fork connector and slide it over the black wire. Use the crimpers to crimp the fork connector to the wires being careful not to split the protective plastic coating on the casing. Repeat this for the white wire and the bare ground wire as well. Give the fork connectors a tug once connected to make sure the wires are snugly connected to the fork connectors.
Step 5
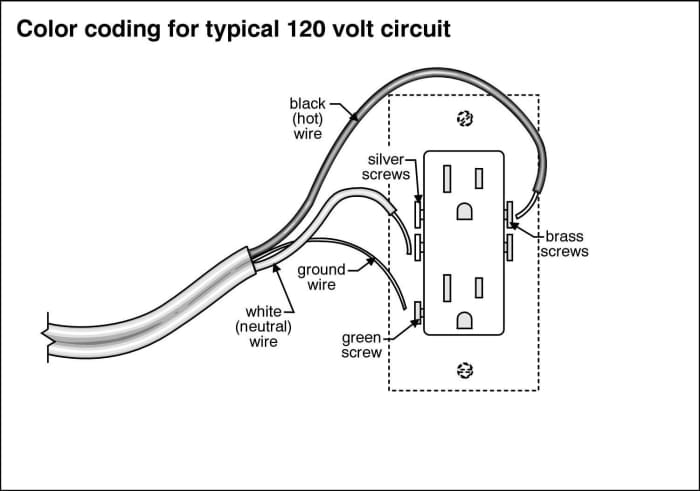
Unscrew the Brass and silver screws on the outlet. Put the fork connector attached to the black wire on the brass colored screw and tighten until the fork connector is snug. Put the fork connector attached to the white wire on the silver screw and tighten until the fork connector is snug. The bare wire fork connector attaches to the green screw usually located at the bottom of the outlet. Loosen the green screw and attach the fork connector on the bare wire and tighten the green screw until snug.
Step 6
Push the outlet back into the outlet box and tighten the set screws. Make sure that the outlet is straight up and down and put the cover back on. Then you can turn the power back on and test the outlet by plugging in a radio or any other standard outlet appliance.
Tips
- Make sure that all of the stranded wires are in the fork connectors to avoid shorting or false connection.
Warnings
- Make sure that the power is off to the areas you are working prior to wiring.
- If you are running new wires, make sure that you have adhered to your local building electrical codes.
Reference
"NFPA 70: National Electric Code," by NFPA, 2008
How to Wire an Outlet With 4 Wires
Source: https://dengarden.com/home-improvement/Connecting-Stranded-Wire-To-An-Outlet